Launching an API integration? Here's the deal: skipping proper preparation can lead to major headaches - like inaccurate results, unexpected charges, or even GDPR violations. This 10-step checklist focuses on geocoding APIs for Germany, where unique postal code rules (8,170 five-digit PLZ codes) and address conventions demand extra care.
Key takeaways:
- Data accuracy matters: Validate German-specific details like umlauts and PLZ formatting.
- GDPR compliance is non-negotiable: Secure API keys, anonymize test data, and encrypt requests.
- Performance counts: Test rate limits, use caching, and implement exponential backoff for retries.
-
Localization is crucial: Properly encode characters, set
region=de, and test for German address conventions.
Whether you're handling logistics, store locators, or address validation, this guide ensures your integration is ready for launch without surprises. Let’s dive into the details.
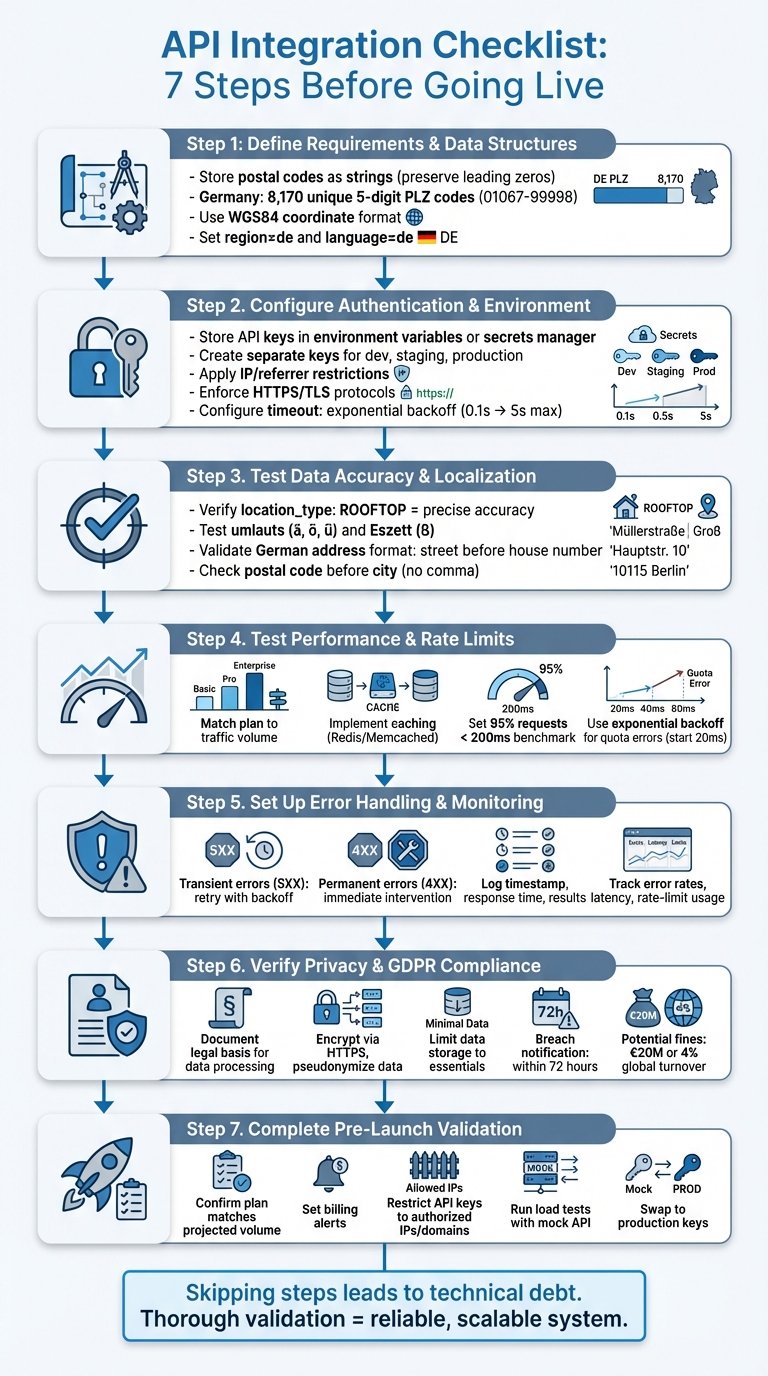
API Integration Pre-Launch Checklist: 7 Essential Steps for Geocoding APIs
What Are the Different Types of API Testing? | API Testing Interview Question and Anwser
sbb-itb-823d7e3
Step 1: Define Requirements and Data Structures
Start by identifying your geocoding needs and the data structures required for working with German postal codes. For instance, you might need a tool to calculate a 15‑km delivery radius or a store locator - both requiring specific API functionalities. Use forward geocoding to turn addresses like "Bölschestraße 86, 12587 Berlin" into geographic coordinates. On the flip side, apply reverse geocoding to translate coordinates back into readable addresses. If you're planning logistics, you'll likely need radius and drivetime filters to define service areas based on postal code boundaries. Once these requirements are set, you can design a data model to support them.
When structuring your data, store German postal codes as strings to preserve leading zeros (e.g., "01067"). Germany has 8,170 unique five-digit postal codes (ranging from 01067 to 99998), which follow a hierarchical structure. Your data model should include fields for postal_code, city, latitude, longitude, and administrative levels like administrative_area_level_1 (Bundesland or state) and administrative_area_level_2 (Regierungsbezirk or district).
Be mindful of special cases, such as Großkunden (large-volume customers), where postal codes might not align with geographic districts. Ensure your validation logic can handle scenarios like ZERO_RESULTS and partial_match flags. Set parameters like region=de and language=de to ensure city names are localized properly, and confirm these settings are integrated into your data model. For compatibility across mapping platforms, store coordinates in the WGS84 format, the global GPS standard.
Finally, choose a Zip2Geo plan that matches your expected request volume. The Starter plan (€5/month or €50/year) supports 2,000 requests, while the Scale plan (€49/month or €490/year) accommodates up to 100,000 requests and includes dedicated support. Make sure your plan covers essential endpoints like ZIP-to-coordinate lookups, reverse geocoding, and radius queries.
Step 2: Configure Authentication and Environment Settings
With your data model ready, the next step is to secure your API access and fine-tune environment settings for stable connections. Start by storing your Zip2Geo API keys securely - either in environment variables or a secrets manager. This precaution is crucial, as the Google API Console Help emphasizes:
"Publicly exposing your credentials can result in your account being compromised, which could lead to unexpected charges on your account".
This step ensures your data model integrates seamlessly with secure operations, laying the groundwork for reliable API performance.
For added security, create separate API keys for development, staging, and production environments. This minimizes risk if a key is compromised. Enhance protection by applying IP address restrictions for server-side applications and referrer restrictions for client-side web apps. To maintain security over time, establish a rotation schedule: generate a new key, update your applications, and delete the old key once migration is complete.
Next, define Zip2Geo base URLs for each environment and enforce HTTPS/TLS protocols - HTTP requests may be rejected outright. Configure timeout settings using exponential backoff, starting at 0.1 seconds and doubling with each retry, up to a maximum of 5 seconds. Avoid scheduling API calls at fixed times (e.g., the start of a minute), as this can mimic DDoS attack patterns and result in blocked requests. Once these environment settings are in place, test thoroughly to confirm both authentication and response reliability.
To ensure accurate results for Germany, apply localized settings. Use language=de to display German labels and interpret common abbreviations like "Str." for Straße. Verify that region=de is set, as described in Step 1, and apply the stricter components=country:DE filter to limit results exclusively to Germany.
Finally, validate all settings during development to avoid issues at launch. Test your API keys to ensure they work correctly, confirm that timeout settings handle slow responses effectively, and check that German addresses with umlauts return accurate coordinates. These steps will help you avoid authentication errors and localization mishaps.
Step 3: Test Data Accuracy and Localisation
Once authentication and environment settings are configured, the next step is to validate the accuracy of your data and its localisation. This ensures the Zip2Geo API performs reliably when handling German addresses in production.
Verify Geocoding Accuracy
Start by testing sample German postal codes against known reference points. Pay close attention to the location_type field in the API response. A ROOFTOP value indicates precise, street-level accuracy, while values like RANGE_INTERPOLATED, GEOMETRIC_CENTER, or APPROXIMATE suggest lower precision levels. Additionally, check the partial_match flag and review the address_components[] to confirm that elements such as postal_code and locality align with German address standards.
Test German Address Conventions
German addresses come with unique formatting and character requirements. For instance, umlauts (ä, ö, ü) and the Eszett (ß) need to be percent-encoded using their % hexadecimal equivalents. Ensure that both "ß" and its alternative "ss" produce consistent results.
The API should also adhere to German address formatting rules. Verify that street names appear before house numbers (e.g., "Kapersburgstr. 9") and that postal codes (five digits) come before city names without commas (e.g., "61191 Rosbach"). Test edge cases, such as postal codes that span multiple areas or addresses with apartment numbers separated by double slashes.
Check Format Compliance
Make sure the API returns data in formats familiar to German users. For example:
- Numbers should follow the format
1.234,56. - Dates should appear as
DD.MM.YYYY. - Distances should be measured in kilometres.
Additionally, ensure the API uses German abbreviations where applicable.
Monitor API status codes during testing. A response of OK confirms successful geocoding, while ZERO_RESULTS indicates no matching location was found. An INVALID_REQUEST points to a malformed query. If you encounter UNKNOWN_ERROR, implement retry logic with exponential backoff to handle temporary issues.
Step 4: Test Performance and Rate Limits
After verifying data accuracy and localization, the next step is to assess how the API performs under realistic conditions. This includes testing its ability to handle traffic loads and enforcing rate limits to prevent slowdowns or disruptions.
Match Your Plan to Expected Traffic
Before choosing a Zip2Geo plan, estimate your monthly request volume to ensure the plan aligns with your needs. Here’s a quick breakdown of the available options:
- Free plan: 200 requests per month, ideal for initial testing.
- Starter plan: €5/month or €50/year, supports up to 2,000 requests monthly.
- Pro plan: €19/month or €190/year, handles up to 20,000 requests per month.
- Scale plan: €49/month or €490/year, accommodates up to 100,000 requests monthly and includes SLA guarantees and dedicated support.
To manage traffic effectively, queue requests and throttle them as needed. If you hit a quota error, implement exponential backoff: start with a short delay (at least 20 ms), doubling the wait time after each retry. This approach helps avoid overloading the system. Additionally, stagger requests to prevent sudden traffic spikes.
Measure Response Times Under Load
Simulate API performance under load by running tests with tools like k6. Use German postal code queries drawn randomly from your dataset to keep the tests realistic. Here’s how you can structure your testing:
- Average-load tests: Assess routine usage patterns.
- Stress tests: Push the system to its limits.
- Spike tests: Evaluate how the API handles sudden surges in traffic.
To mimic human behavior, introduce small, randomized delays between requests. Define clear benchmarks: for example, 95% of requests should complete in under 200 ms, and error rates should remain below 1%. Place load generators in regions where your users are based to avoid skewing latency results.
For large-scale testing, consider using a mock API that replicates Zip2Geo’s responses. This allows you to test your application’s ability to handle high volumes (up to 90,000 queries per minute) without exceeding the actual API’s limits.
Set Up Caching Rules
To optimize performance, implement caching with in-memory solutions like Redis or Memcached. Use a cache-aside strategy with an LRU (Least Recently Used) eviction policy. Since postal code data doesn’t change often, set longer Time-To-Live (TTL) values for cached entries. Additionally, utilize cache-control headers (e.g., max-age and must-revalidate) and ETags for conditional requests, reducing unnecessary data transfers.
Step 5: Set Up Error Handling and Monitoring
Once performance testing is complete, the next step is to establish systems that catch and address issues before they impact users. A solid error-handling framework ensures your integration remains reliable and resilient, even under challenging conditions.
Handle Common Error Scenarios
Different types of errors require different approaches. Here's how to manage them effectively:
-
Transient errors, such as
UNKNOWN_ERRORor 5XX server errors, should trigger automatic retries. Use an exponential backoff strategy starting at 100 ms to handle these issues gracefully. -
Permanent errors, including
INVALID_REQUEST,ZERO_RESULTS, or 4XX client errors, won't resolve through retries. These require immediate intervention.
To standardize error responses, use RFC 9457 ("Problem Details for HTTP APIs") with the application/problem+json media type. Each error should include:
- A machine-readable code,
- A human-readable message, and
- Specific details about the failure.
For German users, ensure error messages are provided in German where applicable. Also, remember to URL-encode all queries to maintain proper formatting.
| Status Code | Meaning | Action Required |
|---|---|---|
| 400 | Bad Request | Fix input validation issues before retrying |
| 401 / 403 | Unauthorized / Forbidden | Check API keys and permissions |
| 404 | Not Found | Address doesn't exist; do not retry |
429 / OVER_QUERY_LIMIT
|
Too Many Requests | Use backoff and review usage patterns |
| 500 | Internal Server Error | Retry using exponential backoff |
UNKNOWN_ERROR |
Transient Error | Retry after a short delay |
Log Request and Response Data
Logging is crucial for troubleshooting and monitoring. Record the timestamp, response time, and result of every API call. Tools like Sentry can automatically log stack traces and commit data. By linking errors, logs, and metrics within a single trace, you gain a comprehensive view of any issue.
Make sure your logging practices comply with EU data protection standards. Retain logs only as long as necessary for debugging, and anonymize any personal information to protect user privacy.
Track Performance Metrics
Stay on top of your integration's health by monitoring three key metrics: error rates, latency, and rate-limit usage. Set up alerts for critical issues, such as OVER_QUERY_LIMIT and User Rate Limit Exceeded, to avoid disruptions. Additionally, track unauthorized access attempts by filtering metrics by credential_id and platform_type in your monitoring dashboard.
Use your service level objectives to guide alert settings. For real-time updates on outages and platform changes, subscribe to the google-maps-platform-notifications group, which typically sends 3-5 messages per month. Also, avoid scheduling API calls at synchronized intervals (e.g., the start of each minute) to prevent traffic spikes that could mimic DDoS attacks.
"The signal we get from Sentry is the most reliable indicator of software issues and is used throughout Instacart because it can be easily configured for each service regardless of the language or framework." - Igor Dobrovitski, Infrastructure Software Engineer, Instacart
Step 6: Verify Privacy and Compliance Requirements
Before launching, it's crucial to ensure your integration complies with German and European data protection laws. GDPR compliance isn't just a best practice - it's a legal obligation that dictates how you handle geocoded data, from collection to storage and processing.
Follow GDPR Requirements
Under GDPR, data processing must be justified by one of six legal bases. For geocoding integrations, this often involves documenting your legal basis, whether it's user consent, fulfilling a contract, or legitimate business interests. Additionally, you need to apply the principles of "data protection by design and by default", which includes implementing "appropriate technical and organizational measures" to safeguard user data.
To secure user information, encrypt and pseudonymize data, and ensure all API requests are transmitted via HTTPS. Limit data storage to what's absolutely necessary - non-essential geocoded content should not be pre-fetched or cached for extended periods.
If your integration involves high-risk data processing, conduct a Data Protection Impact Assessment (DPIA) and establish a Data Processing Agreement (DPA). Organizations handling large-scale monitoring or sensitive data should also appoint a Data Protection Officer.
Your privacy policy must clearly outline what data you collect, why you collect it, who has access, and the measures you’ve put in place to protect it. Additionally, prepare breach response protocols: if personal data is compromised, you’re required to notify the relevant supervisory authority within 72 hours.
With these legal and technical safeguards in place, strengthen your approach by implementing solid internal data governance practices.
Create Data Governance Policies
Document every aspect of your geocoded data processes, including access permissions and retention timelines, in an information audit. Retention periods should comply with GDPR's data minimization principle and Google's caching restrictions.
Restrict API keys by applying application and API-specific limitations. Maintain a clear record of who within your organization has access to geocoded data and their specific purposes for accessing it. You should also establish procedures for handling user rights requests - users must be able to request access to their data, correct inaccuracies, or have their data deleted without difficulty.
Lastly, ensure your policies address attribution requirements. Even while adhering to privacy regulations, you must display the Google logo or proper text attribution if the data isn't shown on a Google Map.
Step 7: Complete the Pre-Launch Checklist
After completing the earlier authentication, performance, and compliance tests, it's time to double-check all configurations and ensure your production environment is ready to handle live traffic seamlessly.
Confirm Plan and Billing Setup
Now that your tests are done, align your infrastructure with your traffic expectations. Choose a Zip2Geo plan that matches your projected request volume. For instance, if you anticipate 15,000 requests per month, the Pro plan (20,000 requests/month at €19/month or €190/year) offers sufficient capacity. For higher traffic, like 80,000 requests monthly, the Scale plan (100,000 requests/month at €49/month or €490/year) provides additional benefits such as SLA guarantees and dedicated support - key for ensuring production stability.
To avoid surprises, set up billing alerts to monitor usage. Since API keys handle both authentication and billing, unexpected traffic spikes can lead to higher costs. Use the management console to track your quota usage and configure alerts as you approach your monthly limit. This helps prevent service interruptions and keeps costs under control.
Run Final Validation Tests
Before going live, perform a thorough system check. Make sure your API keys are restricted to specific backend IP addresses or authorized frontend domains to block unauthorized access. Also, confirm that all production requests use HTTPS/SSL, as unencrypted requests will be rejected.
Double-check special character encoding during your final tests. Verify that your firewall settings allow access to all required API domains over ports 80 and 443. Additionally, ensure error handling follows best practices, like using exponential backoff for retries.
As Stripe advises:
"Don't wait to go live before discovering that you haven't properly written your code to handle every possible error type, including those that should 'never' happen."
Run load tests using a mock API (instead of live services) to confirm your application can manage peak traffic without breaching quotas. Tailor your logic to handle different match types, such as "rooftop" or "locality centroid", especially for resolving German addresses. These final tests are crucial for ensuring your system is ready to switch from sandbox mode to live production. Once everything checks out, swap to your production keys and launch confidently.
Conclusion
Launching a geocoding API integration requires careful planning and attention to detail. Every step in the process - whether it's defining data structures, securing authentication, testing performance, implementing error handling, or ensuring GDPR compliance - plays a crucial role in building a reliable and scalable system. As highlighted by Google Maps Platform:
"Choosing to develop against the non-deprecated versions of the APIs will save you development time and cost down the road once deprecated versions become unavailable".
Skipping steps or taking shortcuts can lead to technical debt, which only grows more challenging (and costly) to resolve over time.
Before going live, thorough validation is non-negotiable. Pre-launch testing should include functional and end-to-end tests in a sandbox environment. Use realistic datasets that account for common misspellings and regional address variations. Load testing with a mock API can also help identify potential bottlenecks and ensure the system performs under pressure.
For projects targeting Germany, localisation and GDPR compliance must be prioritised. Your integration should handle special characters seamlessly, return results in German when necessary, and adhere strictly to privacy-focused practices. GDPR violations can lead to fines as high as €20 million or 4% of annual global turnover, whichever is higher.
Ultimately, the technical choices you make - whether it's deciding between client-side or server-side implementations, managing rate limits, or setting up robust monitoring - will shape the long-term stability and cost-effectiveness of your application. As OpenCage wisely puts it:
"A provider or service is only as good as it is usable".
FAQs
What steps should I take to make my API integration GDPR-compliant?
To make sure your geocoding API integration aligns with GDPR requirements, begin with a data audit. This means identifying any personal data being processed, such as IP addresses or location information, and determining who has access to it. From there, establish a legal basis for processing this data - whether through user consent or legitimate interest - and ensure this is clearly documented in your privacy policy. The policy should be easy to understand and readily available to users.
Practice data minimisation by collecting and storing only the information necessary for your specific purpose. When data is no longer needed, anonymise or pseudonymise it to reduce risks. Always make API calls over HTTPS to ensure secure data transmission, and protect your API keys by storing them safely and restricting their use to authorised applications or IP addresses. Also, provide users with tools to exercise their GDPR rights, such as accessing, correcting, or deleting their personal data.
By combining transparent legal documentation, robust technical protections, and regular monitoring, you can ensure your API integration stays compliant with GDPR standards.
How can I effectively test the performance of my geocoding API before launch?
Before launching your geocoding API, it’s crucial to fine-tune its performance. Here’s how you can get it ready for real-world use:
- Define your testing objectives: Pinpoint the key endpoints and user interactions to evaluate. Set clear performance benchmarks like acceptable latency, error rates, and rate-limit thresholds.
- Simulate realistic scenarios: Create test requests that mirror typical usage patterns. Include valid parameters such as API keys and address data. Start small, sending a low volume of requests to confirm basic functionality and establish baseline response times.
- Gradually scale up traffic: Increase the number of simultaneous requests to replicate both regular and peak usage levels. Keep an eye on response times, error rates, and how the API handles rate limits to ensure it performs well under pressure.
- Review and refine: Analyze test data to identify any weak spots or errors. Adjust configurations or code as needed, and re-run tests until the API meets your performance expectations.
By thoroughly testing and refining your API, you can ensure it delivers accurate results and remains dependable - even during high-traffic periods - offering a smooth experience for your users.
Why is localization crucial when integrating a geocoding or postal code API in Germany?
Localization plays a crucial role in API integration within Germany, as it ensures outputs like error messages and address formats meet the language and cultural norms of German users. By setting specific language and region parameters, APIs can deliver results that align with German conventions, making information clearer and minimizing errors when interpreting details like postal codes or addresses.
Another key aspect is ensuring compliance with local regulations, including EU data protection laws such as GDPR and mandatory HTTPS protocols. Effective localization not only helps meet these legal requirements but also fosters trust among users. By providing region-specific, precise, and legally compliant data, localization significantly enhances the user experience.