Dynamic geofences are virtual boundaries that adjust based on real-time data like postal code updates, traffic, or time-of-day trends. Unlike static geofences, they require regular updates to remain accurate. Here's how to create them effectively:
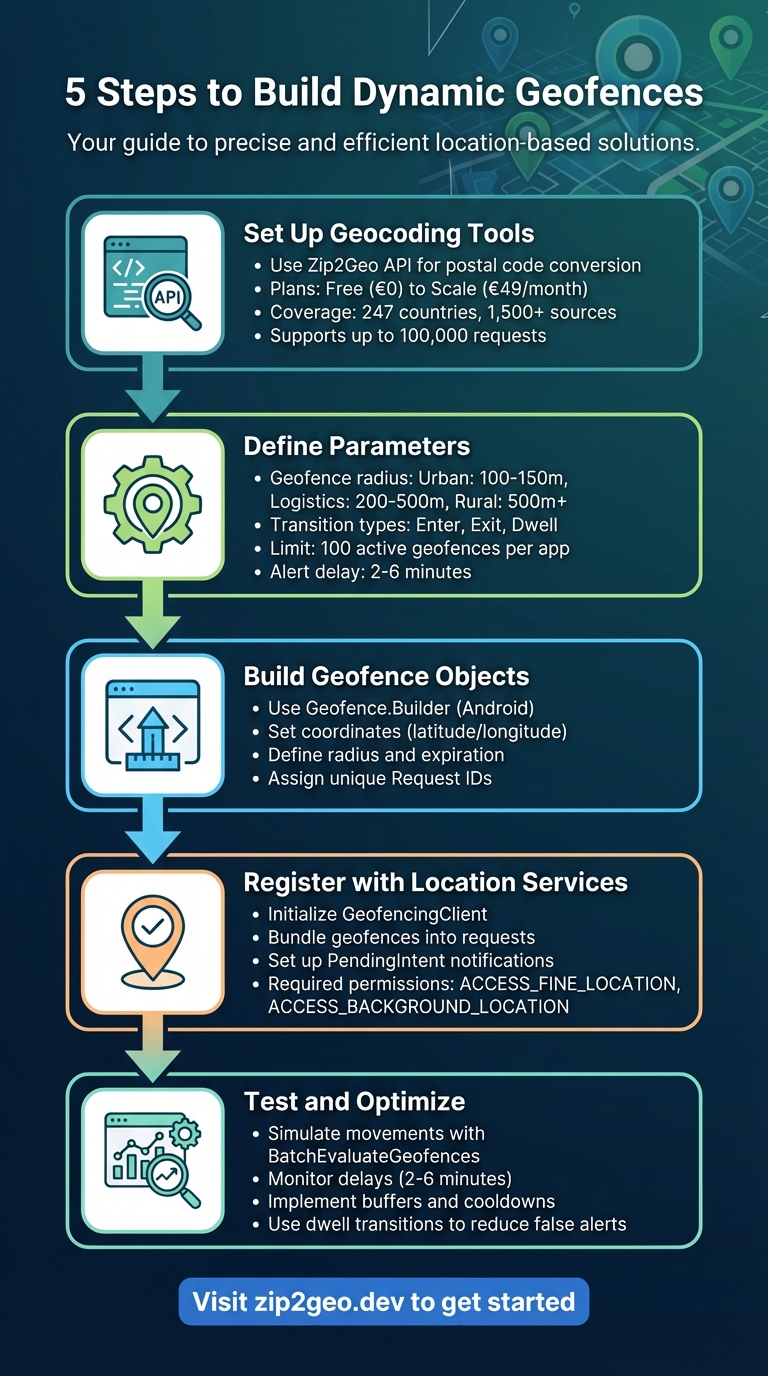
- Set Up Geocoding Tools: Use APIs like Zip2Geo to convert postal codes into precise geographic coordinates. Plans range from free (€0,00) to advanced (€49,00/month), supporting up to 100,000 requests.
- Define Parameters: Choose geofence sizes (e.g., 100–150 m for urban areas) and set transition types like "Enter", "Exit", or "Dwell" to control triggers.
-
Build Geofence Objects: Use platform-specific tools (e.g., Android's
Geofence.Builder) to define geofences with coordinates, radius, and expiration settings. - Register with Location Services: Bundle geofences into requests, ensure appropriate permissions (e.g., background location), and handle transition notifications with PendingIntents.
- Test and Optimize: Simulate movements, monitor delays (2–6 minutes), and implement buffers or cooldowns to reduce redundant triggers.
Dynamic geofencing is ideal for industries like logistics, marketing, and delivery services. Tools like Zip2Geo ensure accuracy by refreshing data weekly from over 1,500 sources across 247 countries. To start, visit Zip2Geo and explore their API options.
5 Steps to Build Dynamic Geofences with Zip2Geo API
Geofencing in React Native with Mapbox with Background Geolocation Tracking
sbb-itb-823d7e3
Step 1: Set Up Zip2Geo API for Geocoding
Getting started with Zip2Geo is straightforward. Begin by signing up for an account, then head over to the "Create an API key" section in your dashboard to generate your unique key. This key serves as your authentication token for all API requests. The Free plan - offering 200 requests per month - lets you test the service without needing a credit card. Once your key is ready, adjust the API settings to match your geofencing needs.
Zip2Geo uses a Bearer token system for authentication. Include your API key in the HTTP request header like this:
Authorization: Bearer YOUR_API_KEY
The API returns JSON-formatted data, making it easy to integrate with modern applications. Before diving into authentication, you can test endpoints in the Zip2Geo Demo environment.
To convert a postal code into geographic coordinates, send a GET request to the /v2/info/zip endpoint. You’ll need two required parameters:
-
countryCode: A two-letter ISO 3166-1 alpha-2 code (e.g., "DE" for Germany or "AT" for Austria). -
postalCode: The postal code you want to geocode.
You can also add an optional fields parameter to filter the response and include only the data your application needs. Make sure to use correct ISO country codes, as incorrect formatting will result in a 400 Bad Request error.
API Plans and Request Limits
Zip2Geo offers four pricing plans to suit different needs:
- Free plan: 200 requests per month at no cost - perfect for small projects or testing.
- Starter plan: €5,00 per month (or €50,00 annually) for 2,000 requests, plus email support.
- Pro plan: €19,00 monthly (€190,00 annually) with 20,000 requests, priority support, and an SLA guarantee.
- Scale plan: €49,00 per month (€490,00 yearly) for 100,000 requests, dedicated support, and uptime monitoring.
Annual subscriptions come with a 25% discount, and existing customers keep their original pricing even if rates increase.
Each plan also specifies the number of concurrent requests allowed. For example, if your plan supports only one request at a time and a second call is made before the first finishes, you’ll get a 429 status code. If your application requires parallel processing, consider upgrading to a higher-tier plan.
Zip2Geo covers over 100 countries, including all of Europe and major global regions. Access to specific endpoints depends on your subscription level. With your plan in place, you’re ready to start sending GET requests to retrieve geodata.
Making Requests and Reading JSON Responses
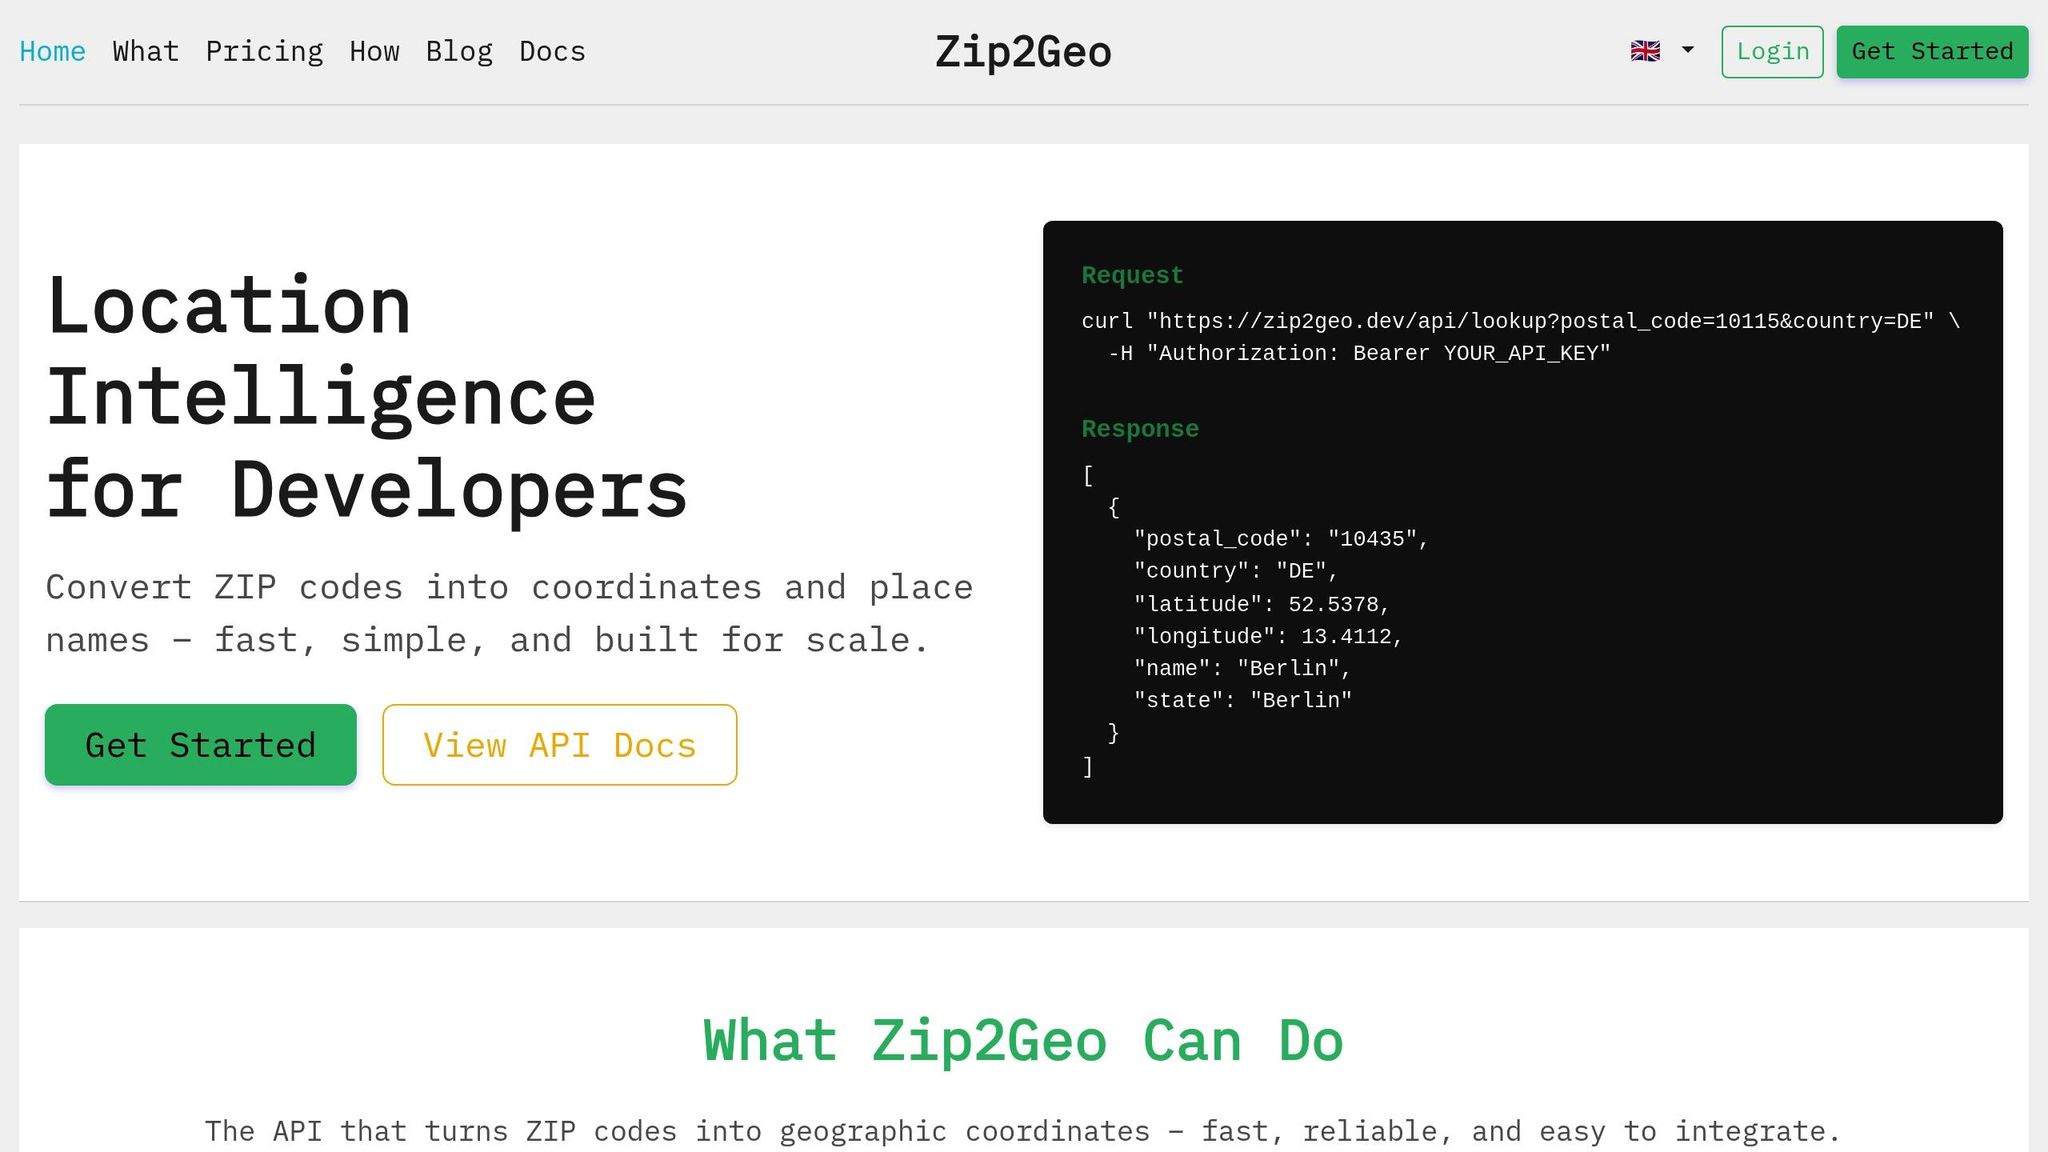
Once authenticated, sending a request is simple. For instance, to geocode the postal code "10115" in Germany, use this GET request:
https://zip2geo.dev/v2/info/zip?countryCode=DE&postalCode=10115
Include your Bearer token in the request header. The JSON response will provide structured data such as latitude, longitude, place names, regions, and country details. All data is sourced from public postal registries, ensuring compliance with GDPR.
If you only need specific fields, use the fields parameter to streamline the response and enhance performance.
To handle errors effectively, monitor HTTP status codes. For example, implement retry logic with exponential backoff for 429 errors or validate input to avoid 400 errors. Testing these scenarios in the Demo environment helps you catch issues early, ensuring smoother deployment to production.
Step 2: Define Geofence Parameters
Once you've integrated the API, it's time to refine your geofence parameters. This step is crucial for balancing performance with battery efficiency. The settings you choose - like radius and transition types - directly affect how well your app functions and how much power it uses. For example, a retail app tracking customers near storefronts will need different configurations than a logistics app monitoring warehouse arrivals. Carefully tailoring these parameters ensures your geofences work effectively for your specific needs.
Selecting Geofence Radius
The geofence radius determines the size of the area being monitored, measured in meters from a central point. For urban environments, a radius of 100–150 meters is generally recommended, as Wi-Fi location accuracy typically ranges from 20 to 50 meters. Smaller radii can lead to missed triggers and faster battery drain.
"For best results, the minimum radius of the geofence should be set between 100–150 metres." – Android Developers
Different environments require different radius settings:
- Urban areas: 100–200 meters
- Logistics zones: 200–500 meters
- Rural areas: 500 meters or more
- Indoor settings: 10–50 meters
Once you've selected an appropriate radius, the next step is to define transition types to control when and how the geofence triggers.
Setting Transition Types
Transition types dictate the conditions under which your app will respond to movement. The main options include:
- Enter: Activates when a device crosses into the geofence. This is ideal for welcoming users or enabling location-specific features. However, frequent alerts can occur if users are only passing by.
- Exit: Fires when a device leaves the geofence, useful for stopping tracking or sending follow-up notifications.
- Dwell: Triggers after a device stays within the geofence for a set period (commonly 2–5 minutes), helping to reduce false alerts.
Keep in mind, Android devices limit apps to 100 active geofences per user. You can also use the INITIAL_TRIGGER_ENTER setting to immediately detect if a device is already inside a geofence when it's registered. Note that geofence alerts aren't instantaneous - there's typically a 2-minute delay, which can extend to 6 minutes if the device remains stationary.
Step 3: Create Geofence Objects in Code
Once you've defined your parameters, it's time to start building geofence objects. Using the coordinates you got from Zip2Geo, translate the API response into platform-specific code structures to create functional geofences that your app can monitor.
Using Geofence Builder Patterns
For this step, take advantage of platform-specific tools like Android's Geofence.Builder to construct your geofence objects. Start by parsing the JSON response to extract the latitude and longitude values. Then, use the setCircularRegion() method to define the geofence with these coordinates and your chosen radius.
Here’s a quick example: initialize the builder, set the circular region (e.g., latitude 51.5074, longitude -0.1278, with a 150-meter radius), specify the transition types using setTransitionTypes(), and set an expiration duration with setExpirationDuration(). This ensures outdated geofences are automatically removed, helping to conserve battery life.
"The latitude, longitude, and radius define a geofence, creating a circular area, or fence, around the location of interest." – Android Developers
Keep in mind that latitude must stay between –90° and +90°, and longitude between –180° and +180°. If these values fall outside the range, the build() method will throw an IllegalArgumentException. Additionally, you can tweak notification responsiveness with setNotificationResponsiveness(). For instance, setting it to 300,000 milliseconds (5 minutes) can reduce battery usage by limiting how often the system checks the device's location.
Once your geofence object is ready, assign it a unique Request ID to keep things organized.
Assigning Request IDs
Each geofence needs a unique Request ID (up to 100 characters) for easy management. This ID allows you to update or remove a specific geofence without affecting others. If you create a new geofence with an existing ID, it will automatically replace the old one.
To stay organized, use a clear naming convention. For example, combine the Zip2Geo location identifier with a descriptive label, like zip2geo_10115_warehouse, for a warehouse located in postal code 10115.
Since geofence objects aren't meant for long-term storage, save their parameters (like coordinates, radius, and Request ID) in a local database or SharedPreferences. This way, you can reconstruct the geofences as needed - whether after a device reboot or if the app's data gets cleared.
Step 4: Add Geofences to Location Services
After creating your geofences (as covered in Step 3), the next step is to register them with location services. This involves bundling your geofences into a request and setting up notifications for when boundaries are crossed.
Creating Geofencing Requests
Start by initializing the GeofencingClient using LocationServices.getGeofencingClient(context). This client gives you access to the geofencing APIs. Use the GeofencingRequest.Builder to group your geofence objects into a single request. Keep in mind that there are platform-imposed limits on the number of active geofences you can have at one time.
When building your geofencing request, you can configure how it behaves initially by using setInitialTrigger(). For example:
- Use INITIAL_TRIGGER_ENTER to immediately trigger if the device is already inside the geofence.
- Use INITIAL_TRIGGER_DWELL to trigger an event after the device has remained in the geofence for a specified period.
On Android 8.0 and newer, geofence events typically have a delay of 2–3 minutes. However, if the device is stationary, this delay can stretch to about 6 minutes.
Before registering geofences, ensure you’ve requested the correct permissions:
- ACCESS_FINE_LOCATION for general geofencing.
- ACCESS_BACKGROUND_LOCATION (required on Android 10 and higher) to monitor geofences when the app is not actively in use.
Once your geofencing request is ready, you’ll need to set up a PendingIntent to handle transition events.
Setting Up Pending Intents
Location Services uses a PendingIntent to notify your app when a geofence transition occurs, even if the app is not running. To handle these events, create a PendingIntent that activates a BroadcastReceiver.
For devices running Android 12 (API level 31) or higher, you must include the PendingIntent.FLAG_MUTABLE flag when creating the intent. Additionally, use PendingIntent.FLAG_UPDATE_CURRENT to ensure the same intent is reused if you add or remove geofences.
Finally, register your geofences by calling geofencingClient.addGeofences(geofencingRequest, pendingIntent). Be sure to include success and failure callbacks to verify the registration process. Keep in mind that geofences do not persist after a device reboot. To handle this, listen for the BOOT_COMPLETED broadcast and re-register your geofences automatically.
Step 5: Test and Optimize Geofences
Once your geofences are registered with location services, the next step is to test their functionality thoroughly. This helps identify and fix configuration issues early on.
Testing Geofence Transitions
To ensure geofences work as intended, simulate device movement to trigger geofence events. A useful tool for this is the BatchEvaluateGeofences operation, which allows you to test how specific coordinates interact with your geofence boundaries - no need to physically move devices around. This approach is particularly helpful for testing tricky edge cases.
It's a good idea to create a dedicated test environment separate from your live system. This keeps test data from interfering with production metrics and allows for controlled experimentation. During testing, monitor confidence levels (ranging from 1 to 3) to identify potential issues like GPS drift or reduced accuracy.
To account for real-world location inaccuracies, implement buffer entries and buffer exits. Buffer entries trigger events as soon as a device falls within the accuracy range of a boundary, while buffer exits wait until the device is well outside the boundary to fire an exit event. For better reliability, you might also consider using GEOFENCE_TRANSITION_DWELL instead of ENTER. This ensures notifications only trigger when a user stays in a location for a specific amount of time.
Keep in mind that Android geofence alerts usually have a latency of less than two minutes. However, this delay can extend to up to six minutes if the device has been stationary.
Once testing confirms that geofence transitions are accurate, shift your focus to monitoring and scaling to maintain consistent performance.
Monitoring and Scaling with Zip2Geo
After your geofences are tested and active, maintaining performance as your usage grows becomes critical. Start by monitoring your API usage to avoid hitting rate limits and adjust your plan as necessary.
Pay close attention to geocoding request patterns to spot any usage spikes. Avoid synchronized requests, where multiple clients access the API simultaneously (such as at the start of each minute), as this can cause traffic surges and trigger rate limits.
For applications managing a large number of geofences, consider consolidating them into fewer collections. While Android devices are limited to 100 active geofences per app, server-side solutions can manage up to 50,000 geofences per collection. Tools like Amazon CloudWatch can help you monitor API health metrics and set up alerts for unusual activity. Additionally, using a cooldown period (e.g., six hours) after a geofence transition can reduce redundant triggers and save API requests.
Conclusion
Creating dynamic geofences is simpler than you might think when you take a clear, step-by-step approach. Start by integrating Zip2Geo, setting up your parameters, building and registering geofence objects, and thoroughly testing the system. With this method, you can deliver scalable location-based solutions to 92% of modern smartphones.
Accurate geolocation data is the backbone of effective geofencing. Without precise coordinates derived from ZIP codes, your virtual boundaries could end up misplaced, leading to false triggers. Thanks to Zip2Geo's global coverage and high-precision geocoding, you can place your geofences with confidence, ensuring they distinguish genuine entries from random location fluctuations.
To fine-tune your implementation, consider these best practices:
- Use minimum radii of 100–150 metres for better accuracy.
- Implement dwell transitions to reduce excessive alerts.
- Apply cooldown periods to cut down on redundant API calls.
These adjustments not only improve battery life but also enhance the overall user experience.
For larger-scale operations, Zip2Geo offers flexible pricing options. From a free tier with 200 requests per month to enterprise plans, you can scale as your needs grow. Its global reach and millisecond response times make it suitable for anything from single notifications to nationwide campaigns.
Ready to take your geofencing to the next level? Check out Zip2Geo's API at https://zip2geo.dev and start building smarter, faster, and more dependable geofencing solutions today.
FAQs
What is the difference between dynamic and static geofences?
Dynamic geofences are virtual boundaries that can shift or change in real time. Their size, shape, or location adjusts based on specific conditions. For instance, they can follow a delivery truck, expand during a storm to account for safety, or monitor the movement of a high-value shipment. This real-time flexibility makes them ideal for situations where constant updates and accurate tracking are crucial.
On the other hand, static geofences are fixed virtual perimeters that stay in the same location, regardless of external changes. These are commonly used for places like stores, office buildings, or restricted zones. They work well for maintaining permanent safety zones or sending location-triggered alerts within a set boundary.
The main distinction? Dynamic geofences evolve with changing needs, while static geofences offer steady, reliable coverage in a defined area.
What advantages does the Zip2Geo API offer for creating geofences?
The Zip2Geo API makes geofencing straightforward by turning ZIP codes into precise geographic details. It provides key location data such as latitude, longitude, city, state, and country, enabling accurate geofence boundary definitions.
Designed with speed and developer convenience in mind, this API uses RESTful endpoints and delivers clean JSON responses. Its global reach and dependable geodata make it a reliable choice for creating dynamic geofences that align seamlessly with actual locations.
How can I reduce battery consumption when using geofences?
To cut down on battery usage when working with geofences, it’s important to configure geofence transitions thoughtfully to avoid constant location checks. For instance, you can increase the notification responsiveness to a longer interval, like 5 minutes. This means the system will only check for entry or exit events periodically, rather than continuously, which helps reduce the frequency of GPS queries.
Another smart approach is using dwell-time thresholds. By setting geofence events to trigger only if the device remains in a specific area for 2–3 minutes, you can avoid unnecessary triggers caused by quick pass-throughs. This small adjustment can make a big difference in energy conservation.
You can also implement smart geofencing by limiting geofences to areas where they are truly necessary. Instead of always activating GPS, consider using APIs like Zip2Geo to fetch location data based on ZIP code transitions. This method allows you to work with broader, more relevant location data while keeping battery usage in check.
By tweaking responsiveness settings, applying meaningful dwell times, and focusing on targeted location data, you can ensure your app functions efficiently without draining the device’s battery.